
Per
Cons
"What's your favorite dish?" is a question found in many a friendship album. In fact, everyone has a dish that he or she particularly likes to eat, but on the other hand there are probably also some ingredients or dishes that do not meet personal taste at all.
Not liking food in general is rather uncommon, at least I haven't met anyone who said to me "I hate food." On the contrary, many feel so strongly defined by their enthusiasm for food that they affectionately refer to themselves as “foodies”.
I also like to count myself among this group and I am therefore all the more pleased to be presented with a test device that is intended to provide even more enjoyment as a cooking aid: the smart meat thermometer MEATER +. In this test you will find out what the gadget has to offer for meat, fish and barbecue lovers.
Scope of delivery
Eco-friendly packaging in a handy format
The packaging shows a minimalist sketch of the MEATER + ...The MEATER + is delivered in brown packaging, which is approximately the length of a Toothbrush corresponds and consists of cardboard. While the front only features the MEATER logo, a sketch printed on the left side shows that there is probably no toothbrush hidden in the handy box. The right side gives the child a name: “Wireless | Smart Meat Thermometer”.
I am excited and open the box (which is not so easy without a loop or flap). Inside, the thermometer itself awaits me, along with the charging holder, in which it is firmly clamped and securely held. Incidentally, the holder fills the box so much that nothing else has room - except, of course, an operating manual, which due to its format is a bit similar to a medical instruction leaflet.
Although - one thing to note, looking at the back of the box, I'm told that the MEATER + needs to be charged for four hours before use. To do this, I open the magnetically attached back wall of the charging holder and immediately discover the AAA battery that came with it. Practical, so I don't have to buy them separately.
Design
Meater relies on clever design & high-quality materials
The design of the MEATER + looks high-quality, albeit minimalist.It goes without saying that a meat thermometer should be able to withstand great heat. That's why the MEATER + is made of stainless steel and ceramics and has two heat sensors: One is in the stainless steel tip and measures the internal temperature of the food in question. The other sits at the base of the ceramic handle and measures the outside temperature.
The thermometer holder, which also serves as a charging station, is made of bamboo wood. As a result, it sets a nice accent to the metallic shimmer of the thermometer, looks high-quality and remains light. Incidentally, this compact and light format is not only practical for transporting the thermometer. With the help of two magnets on the back, it can be attached to the fridge, for example, together with the charging holder, without slipping down.
As already mentioned, MEATER also uses magnetism to attach the battery cover to the back. This works fine, so it's a simple but effective solution.
Apart from the MEATER engraving on the base and a small LED with a button that indicates the battery charge level or the connection of the MEATER + to the smartphone, the manufacturer is reluctant to add any decorations or gimmicks. In terms of design, the focus here was primarily on practicability, which makes sense for a cooking and grilling aid if handling is to remain simple.
All in all, I really like the look of the MEATER + - and given the fairly minimalist and timeless design, most people will probably feel the same way. I find the use of magnets quite clever, especially because I have a rather small kitchen and this fastening solution suits me perfectly.
App setup
Stuffy start to MEATER app
At the beginning the app shows helpful information about thermometer...My MEATER + is loaded, now the fun part begins: the cooking! Well...almost, because so that the smart meat thermometer can send me the measured data, I have to quickly install the MEATER app.
"Fast" is exactly the keyword here, because setting up the application unfortunately takes a lot longer than I expected. But let's start from the beginning.
When the app is started for the first time, a welcome message appears followed by some clear and interesting information about the MEATER +, such as its structure or the connection via Bluetooth. Personally, I find this approach to be quite appropriate and successful.
A little later, however, I come across a few points that trigger a lack of understanding and impatience in me. What I don't understand, for example, is the prompt to activate my location so that the thermometer can connect to my smartphone via Bluetooth. Later I was also asked to create a MEATER Cloud account.
Unfortunately, I have no idea what connection there should be between my location or a cloud and the Bluetooth connection. That statement doesn't really make sense to me.
Nevertheless, I finally want to start cooking, so set up my account and activate my location. I euphorically prepare all the ingredients – until something else comes up: an update. A whopping 12 minutes later I finally turn on my stovetop for the first time – finally!
Preparation
Clear app interface with practical tips & Extras
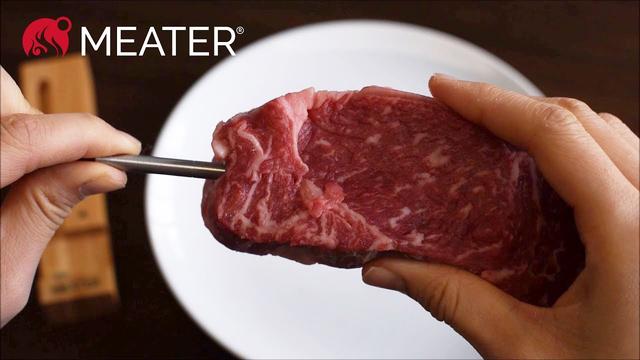
The safety notch has to disappear into the meat.Before I tell you about my cooking experience with the MEATER +, it should be mentioned that, in my early 20s, I have had relatively little experience with the steak preparation - to be more precise: none at all. I am all the more relieved when I discover that the app helps me even before the preparation.
On the one hand, this is due to the clear user interface, which accompanies my cooking process step by step. To start, I place the thermometer in the meat. If I need help, the app shows me an info graphic and links to a video with more detailed instructions.
Now I choose which meat or which fish I want to prepare. In my case, a ribeye steak should end up on the plate.
After my selection, the different cooking levels are immediately presented to me - including the recommendation of the USDA (United States Department of Agriculture), i.e. the United States Department of Agriculture. In order to guarantee safe enjoyment, the core temperature of my steak should be at least 66 degrees, which corresponds to a "medium well". Finally, I set my target temperature with the controller above it. I choose 55 degrees, so "Medium Rare".
By the way, MEATER also offers recipe videos in the app for a wide variety of dishes, such as corned beef, rack of lamb, Christmas goose or turkey. Although all film clips are only available in English, they are usually accompanied by little text and are produced in a very clear and high-quality manner. This should allow even people with little knowledge of English to follow most of the videos.
Preparation & End result
MEATER returns the temperature & Turn the sound on
A few minutes of stovetop heat and some seasoning later, I sling my steak into the skillet. The MEATER app immediately gives an approximate preparation time of 10 minutes. I find the graphic representation to be very clear.
The cooking time is shown in large letters in the middle. This value is also illustrated by three markers and a heat bar. The legend at the top shows the meaning of the markers: The purple pointer indicates the current indoor temperature, moving step by step from the left towards the centre. This is where the blue and green triangles are: blue stands for my previously defined desired internal temperature, green for the current external temperature, which is measured on the ceramic handle. This is the temperature that is just outside the steak in the pan.
So here I am, turning my steak in the pan and looking excitedly at my smartphone. You could almost think this is a fun little mobile game – until my phone vibrates 1-2 minutes before the end of the cooking process to warn me: "Warning, your steak will be ready soon."
A little later everything happens very quickly. My smartphone rings, vibrates and flashes red: now I have to take the pan off the heat. The app is now telling me to let my steak rest for a bit. A few moments later, the indicator finally turns green. It's time for the bleed.
The steak is in the pan, the MEATER app tells me for how long.Conclusion
The meal is done - is the MEATER a "plus" or "minus"?
< p>My steak isn't done, it was supposed to be "Medium Rare" - and that's what happened. It should be clear that this type of preparation does not suit everyone. As mentioned in the introduction, tastes are different. Surely there will also be steak lovers and professional chefs who will say: "A steak belongs on the grill!" But all of that shouldn't be the point now.At the end of my test, I ask myself the question: "Would I recommend the MEATER +?" My answer to that is, "Yes!" And that has its reasons.
In my opinion, MEATER has managed to develop a gadget that has the potential to inspire hobby cooks and occasional grillers as well as professionals.
Sure: The app had its teething problems and could certainly be optimized in one place or another, but once it's set up, it works perfectly. I was particularly impressed by the recipe videos, but also by the clear operation.
Beginners like me are taken by the hand by the application and get the feeling: nothing can go wrong. My initial uncertainties about the right cooking temperature or the right cooking time were eliminated from the start. If you want to do without this type of guidance, you can, for example, deactivate the alarm at the end of the cooking time in the settings.
Of course, other than a successfully cooked steak in Medium Rare, I have no evidence that the thermometer is spot on. At least I didn't do any analog comparison measurements. Nevertheless: My first steak preparation was a success with the MEATER + - and that's a plus point, isn't it?
For just under 110 euros, the gadget is not a bargain, but it promises a long service life and can be combined with other MEATER thermometers. Finally, I can recommend the smart meat thermometer to anyone who likes to cook or grill meat, values the choice of high-quality materials, wants to expand their cooking range to save space and has no problem pulling out their smartphone from time to time during preparation.
RSS feed
Become an author!
This article was published by Maria Klipphahn.Maria Klipphahn has already written 65 articles.Be there too: become an author now and share your knowledge!


Digital outfit of the week: Thumby...
Helene Fischer: 11 hit star outfits...
KUMMER criticizes the brand mania i...
Austro candidate Milica on DSDS: 'L...